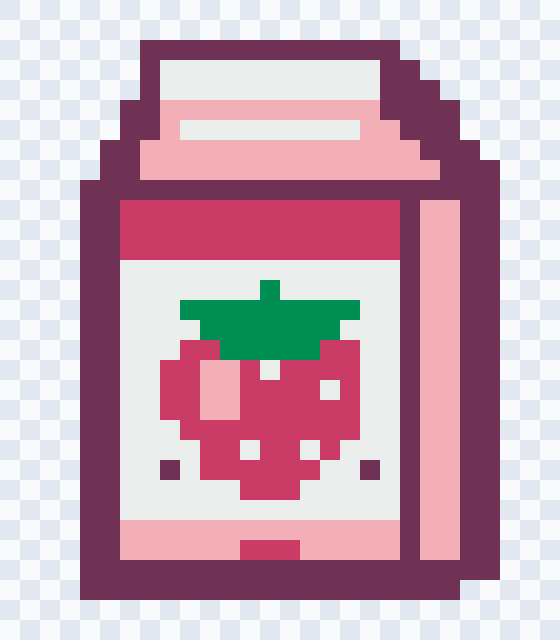
A bead pattern is easier to follow when you can answer three questions: which positions need beads, which color goes there, and how many of each color should you prepare? Let’s use one real, published pattern rather than a made-up chart.
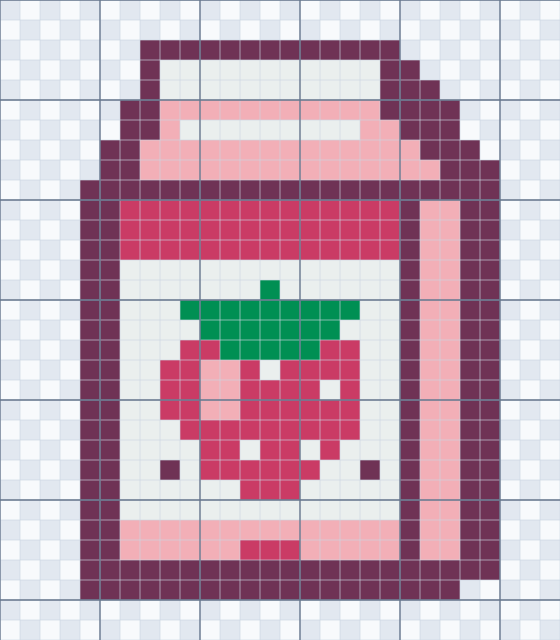
Our example is Strawberry Milk Carton, an original ImageToBeads design using the Perler palette. It is 28 cells wide by 32 high, with 554 beads in five colors. The two pictures above show the same saved pattern: its color view and a view with reading lines. Neither is a photo of a bead piece.
Find the beads, then the empty cells
Each occupied position in this pattern calls for one bead. The pale checkerboard outside the milk carton marks empty positions; leave those pegboard positions open. The grid has 28 × 32 = 896 positions, but only 554 contain beads. The remaining 342 are empty, not a sixth color.
The near-white carton front is different. Its Perler color code is 80-19001, and the material list counts 134 white beads. On a bright screen or print, white and empty can look similar. Check the cell outline and the materials list instead of assuming a light square is blank.
The faint lines mark individual cells; darker lines every five cells help you keep your place. They are reading aids, not additional beads or proof that the pattern fits a particular board. If you prefer circles, switch the display style after opening beading mode or the download options. The underlying positions and counts stay the same.
Read the color list before placing beads
A color swatch helps you find an area, but the palette code tells you which listed color the pattern uses. Codes belong to their named palette; do not treat a similar-looking code from another brand as the same bead. This example’s five Perler codes and counts come from its published pattern document:
| Pattern color | Perler code | Beads |
|---|---|---|
| Deep plum outline | 80-15248 | 194 |
| Near-white carton | 80-19001 | 134 |
| Light pink folds | 80-15203 | 110 |
| Strawberry pink | 80-15256 | 94 |
| Green leaves | 80-15199 | 22 |
| Total | 554 |
The long official codes appear in the materials list. A cell without a printed code is still occupied if it has a bead color; the tool only places short codes inside cells when they fit. Screen color and printed ink are visual references, not a guarantee of a physical bead match.
Check the grid size against your own board
28 × 32 describes the pattern grid, not the number of pegs on a board you own. The colored carton occupies a smaller area than the full grid because some edge positions are empty. Look at both axes and the outline before choosing a board or deciding how to split the work.
If you use a printed chart under a clear pegboard, physical alignment matters. Perler’s Arcade Sign instructions describe sliding an actual-size pattern beneath a clear board. That is guidance for its project; this article does not establish that our example or a screen image prints at the right scale for your board.
Follow one color at a time on screen
Open the published carton pattern and choose Start beading. The beading view highlights the selected color and dims the others, so you can focus on its positions. Starting with the 22 green positions gives you a small section to locate; choose whichever color suits your way of working.
When you finish a color, choose Mark this color complete. It moves to the completed list and the next unfinished color becomes selected. This records progress by whole color. It does not know which individual beads you placed or whether half a color is done, so mark a color complete only when you are ready. You can mark it incomplete again.
The site keeps one beading task in this browser, separate from your editing draft. You can return through Continue beading. Starting a different pattern asks before replacing that task. Clearing site data can erase progress, and it does not sync across devices. This is a reading and tracking aid; we have not physically assembled or tested this example.
If you need paper, test the PDF first
From the pattern page, choose Download pattern, then PDF · Beta. The PDF includes a materials list and building pages. You can split those pages by pegboard or by paper; the overview is for orientation and is not actual size.
Before printing the whole chart, open First time printing? Check the size and print the test page. Set your printer or PDF viewer to 100% / Actual Size, with “Fit to page” off. Measure both printed 100 mm lines with a physical ruler, enter what you actually measured if they differ, then print a fresh test page. Finally compare the test grid’s peg positions with your own clear board. Save the settings only after checking; repeat the check when the printer, paper or PDF viewer changes.
PDF printing is still Beta. The software can prepare and preview page geometry, but we have not verified this design against every printer or pegboard. A screen preview cannot establish physical fit. You can also download a PNG if you mainly need a digital reference.
When the chart is hard to follow
- White disappears into the page: use the outlined grid and color list. White beads count; checkerboard positions do not.
- You lose your place: show cell lines and five-cell guides, zoom in, or select a color in beading mode.
- Your board and print do not line up: check the board’s peg counts and spacing, print at actual size, use the PDF test page, and adjust only from measurements. Do not assume a preset width is a universal board standard.
- The bead in your hand looks different from the screen: confirm the intended brand and official code. We have not tested physical color matching for this article.
If you are still making your first pattern from a photo, start with our photo-to-pattern guide. Once you have a pattern, return here to read it.